Forms
Forms are first-class citizens in Espanso. They can be used to create structured templates that accept multiple arguments, and even pass those values to custom scripts. Some common use-cases might be:
- Create structured email replies, ideal for customer support and repetitive writing.
- Generate customized documents starting from a common template.
- Create input prompts to gather script arguments.
Getting started
Let's say you want to create a match for birthday greetings personalized with a person's name. With forms, you could achieve that with:
  - trigger: ":greet"
    form: |
      Hey [[name]],
      Happy Birthday!
Then, after typing :greet, you will be prompted with:

After entering the desired name, we can submit the form either by clicking "Submit" or pressing CTRL+Enter.
The key here is to specify the form field rather than replace, which is a shorthand for the verbose syntax explained in the following sections.
You can create as many fields as you want, just use the double-brackets [[field_name]] syntax.
Controls
In the previous example, we've seen how to use simple text fields, but Espanso supports many controls, such as:
- Multiline text field
- Choice box
- List box
To use another control, we need to specify it in the form_fields parameter.
For example, let's say we want to add a custom message within our previous greetings.
To do so, we can add a multiline text field:
  - trigger: ":greet"
    form: |
      Hey [[name]],
      [[text]]
      Happy Birthday!
    form_fields:
      text:
        multiline: true
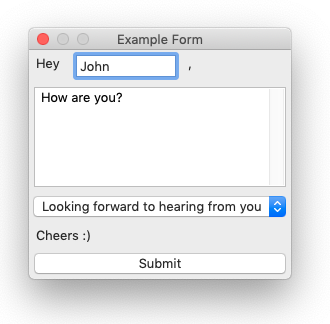
After saving and triggering the match, we would be prompted with a form like the following:

Let's analyze the most important bits:
- Inside the
formparameter we specified the[[text]]field. This name is arbitrary, you can put whatever you want there. - In the
form_fieldsparameter, we specified that thetextfield had propertymultiline: true
Each control has its own options, so let's see them separately:
Text Fields
Text Fields are the default control type. Anytime you specify a new field using the [[field_name]] syntax, that field is considered a text field, if not specified otherwise.
| Property | Description | Default value |
|---|---|---|
multiline | If true, the text field becomes a multiline text area | false |
default | Specify the default value of the field | (empty) |
Choice Box
Choice boxes are fields that let you choose a value from a list. In order to use it, you have to specify the type: choice parameter, along with an array of values:
  - trigger: ":form"
    form: |
      [[choices]]
    form_fields:
      choices:
        type: choice
        values:
          - First choice
          - Second choice
Which produces:

You can also specify the list of values as a multiline string:
  - trigger: ":form"
    form: |
      [[choices]]
    form_fields:
      choices:
        type: choice
        values: |
          First choice
          Second choice
This is useful when you want to dynamically populate a list with the output of a shell command or script, as described in the Variables section.
| Property | Description | Default value |
|---|---|---|
values | The list of values to choose from. This can be either a multiline string or an array of strings. | [empty] |
default | Specify the default value of the field. | (empty) |
trim_string_values | If you pass the values as a multiline string and this option is true, Espanso will trim the values and remove empty ones. | true |
List Box
List boxes are equivalent to Choice Boxes, with the only difference being the appearance.
To use them, you will need to specify type: list rather than type: choice.
  - trigger: ":form"
    form: |
      [[choices]]
    form_fields:
      choices:
        type: list
        values:
          - First choice
          - Second choice
Which produces:

Form sizes
Input fields are 100 pixels wide, but if their line contains no other text they expand to fit the width of the longest line of text plus input-boxes, in the form layout.
Using Forms with Script and Shell extensions
The syntax proposed above works for most cases, but you might want to take it a step further and use Forms with Script and Shell extensions.
The first important thing to understand is that the following syntax:
  - trigger: ":form"
    form: "Hey [[name]], how are you?"
is a shorthand for the following match:
  - trigger: ":form"
    replace: "Hey {{form1.name}}, how are you?"
    vars:
      - name: "form1"
        type: form
        params:
          layout: "Hey [[name]], how are you?"
In a nutshell, Espanso is generating a form with the given layout,
and then injecting the resulting fields (form1.name) into the replacement text.
Some of you might have already understood that forms are extensions as well,
just like the Date and Script ones.
With that being said, let's see how can we use forms with the shell extension.
Let's say that we want to create a match that prompts for user input, and then expands to the reverse of what the user inserted. That could be implemented with:
  - trigger: ":rev"
    replace: "{{reversed}}"
    vars:
    - name: form1
      type: form
      params:
        layout: |
          Reverse [[name]]
    - name: reversed
      type: shell
      params:
       cmd: "echo '{{form1.name}}' | rev"
The key aspect here is that the value of the form field is injected in the shell's cmd field.
To understand more about variable injections, please read the Variables section.
A note for Windows users
The previous example only works on Unix systems (Linux and macOS), because on Windows
you don't have the rev command by default.
That said, these concepts are valid on Windows as well.
Controls with the Verbose syntax
If you want to use other controls (choice box, etc) in a form using the previous syntax (verbose),
you will need to specify the fields parameter:
  - trigger: ":form"
    replace: "Hey {{form1.name}}, how are you? Do you like {{form1.fruit}}?"
    vars:
      - name: "form1"
        type: form
        params:
          layout: "Name: [[name]] \nFruit: [[fruit]]"
          fields:
            name:
              multiline: true
            fruit:
              type: list # or `choice`
              values:
                - Apples
                - Bananas
                - Oranges
                - Peaches
Note that the fields parameter content follows the same format as the form_fields parameter explained above.
Tip for macOS users, enabling Tab traversal
By default, the Tab key can only be used to change focus between Text fields on macOS. To make forms completely navigable using the Tab key (including Lists, Selects and Buttons), you have to follow these steps:
- Open System Settings
- Navigate to the Keyboard panel
- Set the Keyboard navigation toggle switch to "on".
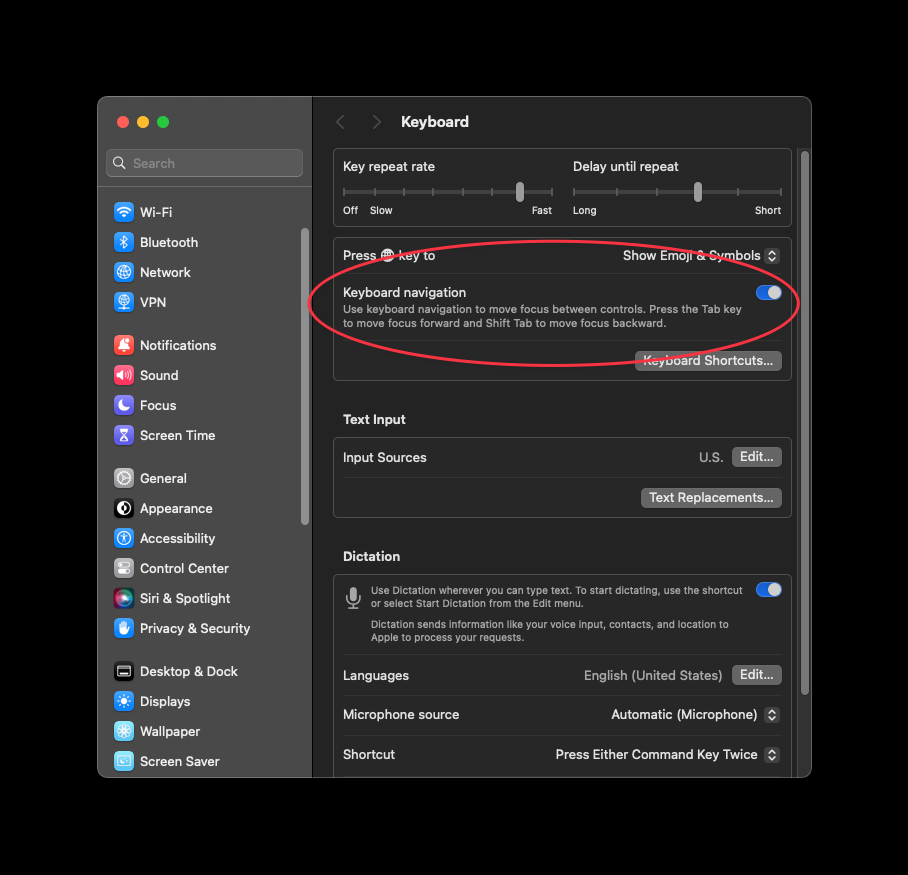
Then you should be able to use the Tab key to navigate between form controls.