Configuration changes
If you are coming from the legacy version, the concept of default.yml file
will be familiar to you. That file represents the "main" configuration, or in
other words, the one that applies to all applications by default. For example,
the following default.yml defines a snippet that replaces :espanso with
Hi there! and forces Espanso to always use the Clipboard backend.
backend: Clipboard

matches:
    - trigger: ":espanso"
      replace: "Hi there!"
If you wanted to use a different configuration, or a different set of matches,
on a specific application, you would have defined an
App-specific configuration.
These files are placed in the $CONFIG/user directory and are very similar in
structure to the default.yml, with the only exception being they define a
filter.
For example, the following configuration is activated only while using Chrome.
It increases the injection delay while also defining a new snippet :test.
filter_exec: "chrome.exe"

inject_delay: 100

matches:
    - trigger: ":test"
      replace: "Works only on chrome!"
Finally, users could split their configuration over multiple files with the
parent option. For example, the following configuration defines the sig
snippet within the $CONFIG/user/emails.yml file.
parent: default

matches:
    - trigger: ":sig"
      replace: "Best regards, Federico"
Thanks to the parent: default option, having this file is equivalent to adding
the sig snippet to the default.yml file directly. In other words,
parent: default means: "merge this configuration with the default.yml"
After this recap, let's see what are the major problems of this approach and how the new format solves them.
Problems
The legacy format, while working for simple use-cases, had some limitations. For instance, it was difficult to share snippets between app-specific configs or selectively disable some snippets.
Some common use-cases that were difficult (or impossible) to achieve in the previous version:
- Define a set of code snippets and enable them while using
VSCodeandIntelliJ Idea, but not while using other apps. - Disable the
all-emojispackage while coding onVSCode.
The new configuration format solves all these problems.
Splitting responsibilities
To solve these problems, Espanso now separates matches from configurations.
Instead of defining everything in the default.yml file, you will now need to:
- Define your matches and global variables in the
$CONFIG/match/base.ymlfile. - Define the configuration options in the
$CONFIG/config/default.ymlfile.
For example, this legacy config file:
backend: Clipboard

matches:
    - trigger: ":espanso"
      replace: "Hi there!"
should now be divided into two separate files:
matches:
    - trigger: ":espanso"
      replace: "Hi there!"
backend: Clipboard
The split was necessary to support this new requirement:
- Only one configuration should be active at any given time, either the default or an app-specific one.
- Multiple match sets (a fancy name for
.ymlfiles that contain matches) can be active at any given time.
The key concept to remember is that any configuration is associated with zero or more match sets. In other words, each configuration can specify which matches should be used when active.
This simple rule becomes incredibly powerful when paired with the concepts discussed in the next sections.
How YAML files are loaded
When started for the first time, Espanso creates a default configuration for
you. This configuration is defined in the $CONFIG/config/default.yml file and
contains the options that will be applied to all apps, unless a more specific
rule is defined.
In the previous section, we explained that each configuration defines which
matches should be used when the configuration is active. By default, every
.yml file defined in the $CONFIG/match/* directory is used by the default
configuration, unless it starts with an underscore _.
For example, if your $CONFIG/match/base.yml file contains the following:
matches:
    - trigger: "hello"
      replace: "world"
then every time you write hello, you will see world appear.
This happens because the $CONFIG/match/base.yml file is included by the
default configuration.
In the same way, if you define another file $CONFIG/match/emails.yml:
matches:
    - trigger: ":sig"
      replace: "Best regards, Federico"
you will be able to write :sig and see your signature appear. Again, this
happens because every YAML file placed in the $CONFIG/match directory is
included in the default configuration.
Includes and Excludes
Altough what we've discussed so far should work well for simple use-cases, let's now explore a more advanced one.
Let's say you want to create a set of code snippets that should only be active when using VSCode.
First, let's create the match set containing the code snippets:
matches:
    - trigger: "print"
      replace: "console.log('hello')"
    - trigger: "<a>"
      replace: "<a href=''>Link</a>"
As you can see, we called the file _code.yml and not code.yml. The
underscore prevents espanso from including the match set into the default
configuration. In other words, without it those snippets would be always
active, not just when using VSCode.
Now that we defined the match set, we need to create an app-specific configuration for VSCode:
filter_title: "Visual Studio Code"

includes:
    - "../match/_code.yml"
In a nutshell, this configuration is activated when using VSCode and includes the code snippets we created earlier.
Let's say you then start using Sublime Text and you want to include the code snippets there as well. You can easily do so by creating another app-specific configuration:
filter_title: "Sublime Text"

includes:
    - "../match/_code.yml"
warning
The filters we've used so far (eg. filter_title: "Sublime Text") might not
work on every operating system, so it's important you find the right ones. A
good starting point is this tutorial TODO (we are still writing the docs, please
be patient :) )
Espanso supports also other resolution mechanisms, such as the excludes
keyword, that makes it possible to selectively disable packages and match sets
inside applications.
Although many aspects of the new resolution system are still to be discussed, we'll stop here to avoid going out of topic.
If you want to know more, please read the TODO section (TODO: we are still in the process of writing the docs, please be patient :) )
Automatic migration
To make the transition easier, Espanso v2 comes with an automatic migration tool. You can use it in two ways:
- When first launched, Espanso shows a GUI wizard to perform the migration.
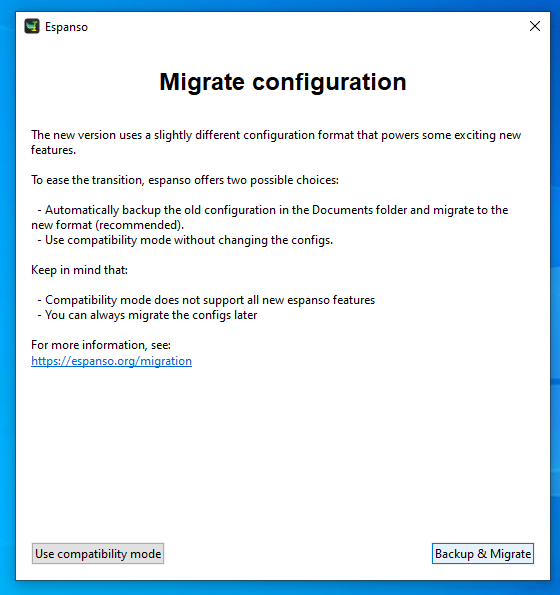
- You can also run the migration from the terminal by running
espanso migrate
In both cases, espanso will backup your current configuration in the Documents folder before proceeding with the migration.